FrontEgg: Customer Configuration Guide
This guide walks IDC customers through setting up a new SSO (SAML) connection with IDC using the Frontegg authentication solution. By the end of this setup, your users will be able to log in securely using your Identity Provider (IdP).
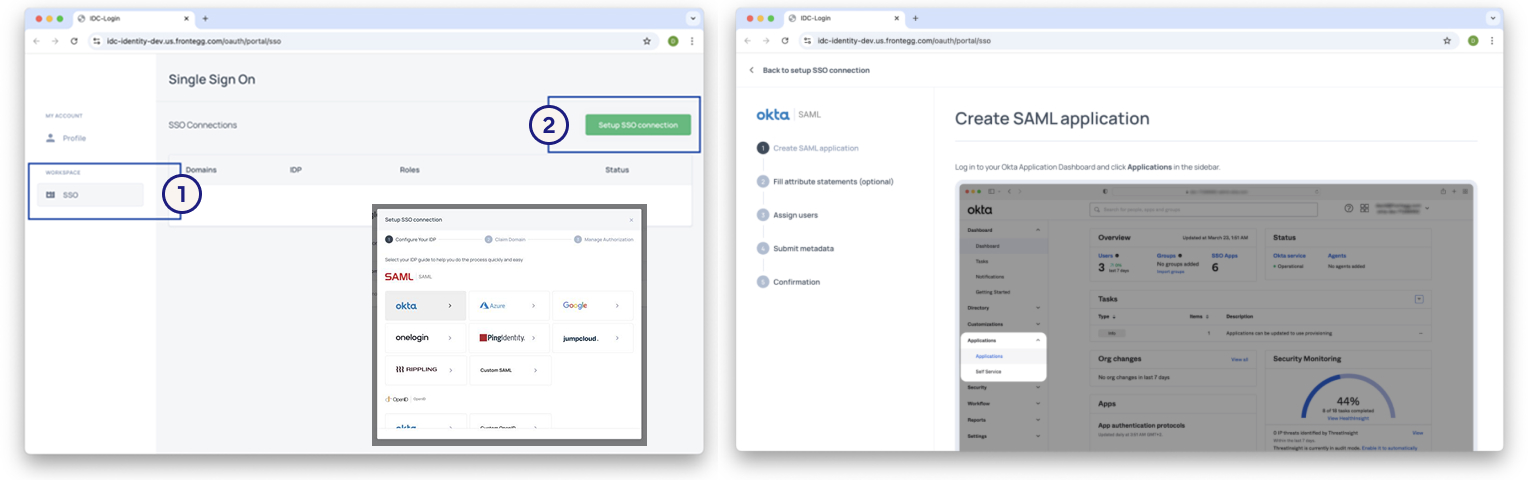
Frontegg provides a built-in setup wizard for most major IdPs, including Okta, Azure AD, Google, Ping Identity, OneLogin, JumpCloud, and Rippling. During setup, simply select your IdP in the wizard and follow the guided steps. These wizards automatically generate the correct fields (Entity ID, ACS URL, Metadata) and streamline the process. If your IdP is not shown in the Frontegg setup wizard, please choose Custom SAML Setup.
More information can be found in the Appendix of this document.
Who should use this guide
IT administrators with access to:
- IDC Admin Portal
- Your IdP (Okta, Microsoft Entra ID (formerly Azure AD), Ping, etc.)
- Your DNS provider (or the ability to request DNS updates)
Estimated time to complete: 30–60 minutes. DNS propagation usually completes within minutes, but in some cases it may take up to 24 hours.
Prerequisites Checklist
Before you begin, confirm you have:
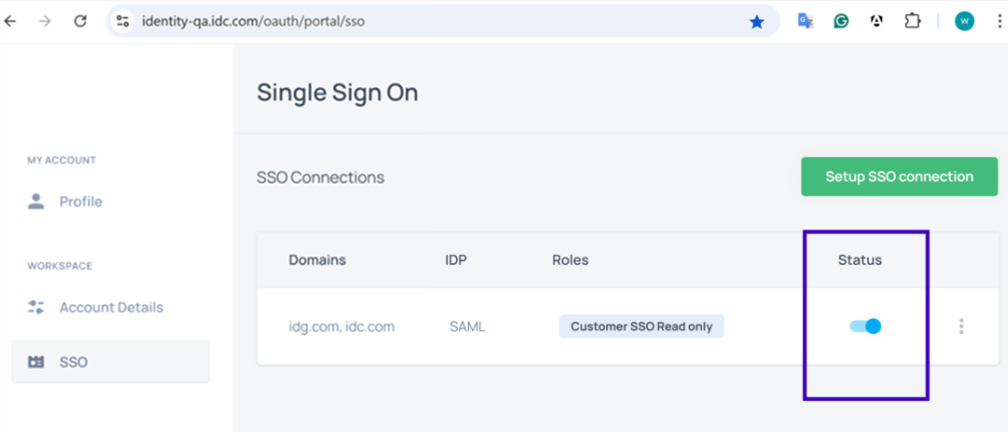
- Access to IDC Admin Portal (https://identity.idc.com/oauth/portal/sso).
If you haven’t already done so, set your password for the IDC Admin Portal by following the instructions in the email you received with the subject line: “Welcome to IDC – Let’s Activate Your Account.”
If you haven’t received the email, reach out to idc_support@idc.com - Read this document and the resources in the Appendix
- DNS administration privileges. If not, engage your DNS administrator to partner in the setup.
- Ensure you provide the mandatory SAML attributes:
– A unique user identifier as the SAML NameID (either in persistent format or an
email address format).
– The user’s email address (SAML attribute with namehttp://schemas.xmlsoap.org/ws/2005/05/identity/claims/emailaddress)
– The user’s given name (attribute.../givenname).
– The user’s surname (family name attribute.../surname)
Critical: Incorrect or missing SAML attributes are the most common cause of SSO login failures.
Step-by-Step Configuration
Step 1: Log in to the IDC Admin Portal
1. Navigate to https://identity.idc.com/oauth/portal/sso
Please sign in with your admin credentials (email and password).
Step 2: Configure a New SSO (SAML) Connection
- In the Admin Portal, go to the SSO tab
- Click Setup SSO Connection or Configure SAML
- Choose your IdP from the list, or select Custom SAML
Note: In the IdP selection wizard, you will see Azure as an option. This refers to Microsoft Entra ID (formerly Azure Active Directory). Microsoft rebranded Azure AD to Entra ID in 2023. Please use the Azure option if your organization uses Microsoft Entra ID as your IdP.
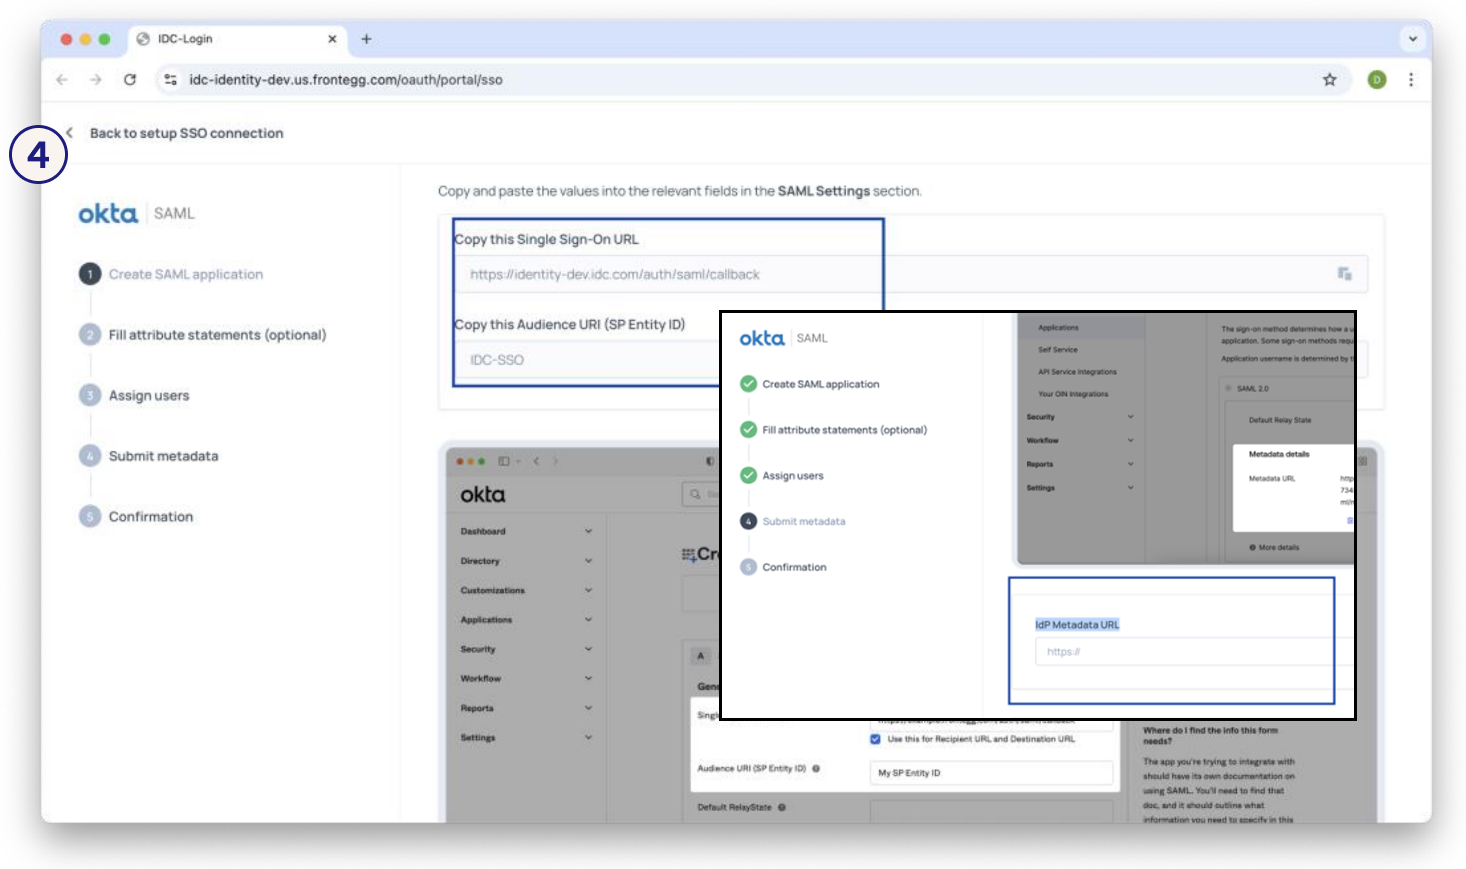
- Provide one of the following:
- IdP metadata URL (recommended), OR
- Manual details:
– SSO endpoint (from your IdP)
– Public certificate (from your IdP). By default, it is included in the metadata URL.
Important:
Incorrect SAML attribute mapping is the most common cause of login failures.
Before you continue, confirm the 4 attributes in your IdP exactly match the format summarized in Prerequisites Checklist section above.
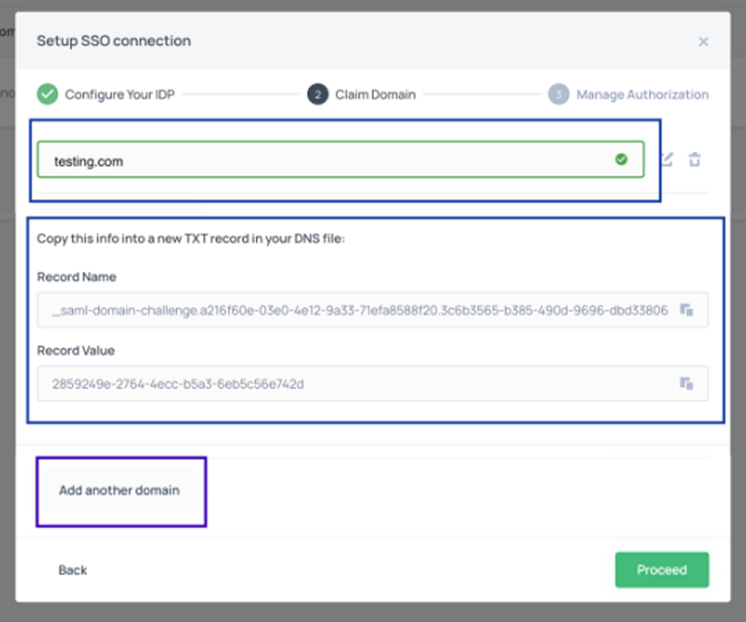
Step 3: Claim Your Domain
- Enter your company’s domain (e.g., acme.com for john.doe@acme.com)
- Copy the TXT record provided
- Add the TXT record to your DNS provider. Example format:
Name: _saml-domain-challenge.uuid.acme.com
Type: TXT
Value: xxxxxxxx-xxxx-xxxx-xxxx-xxxxxxxxxxxx - Wait for DNS propagation (typically 15 minutes – 24 hours)
- You can use tools like dig, nslookup, or online DNS checkers to verify that the TXT record has propagated correctly
- Once you see that DNS propagation is complete – click Validate in the Admin Portal
- If you have more than one domain or subdomain, repeat all steps under “Claim Domain” for each one
If verification fails:
- Confirm the TXT record is added at the correct DNS level
- Check for propagation delays using tools like dig or online DNS checkers
- Work with your DNS admin if needed
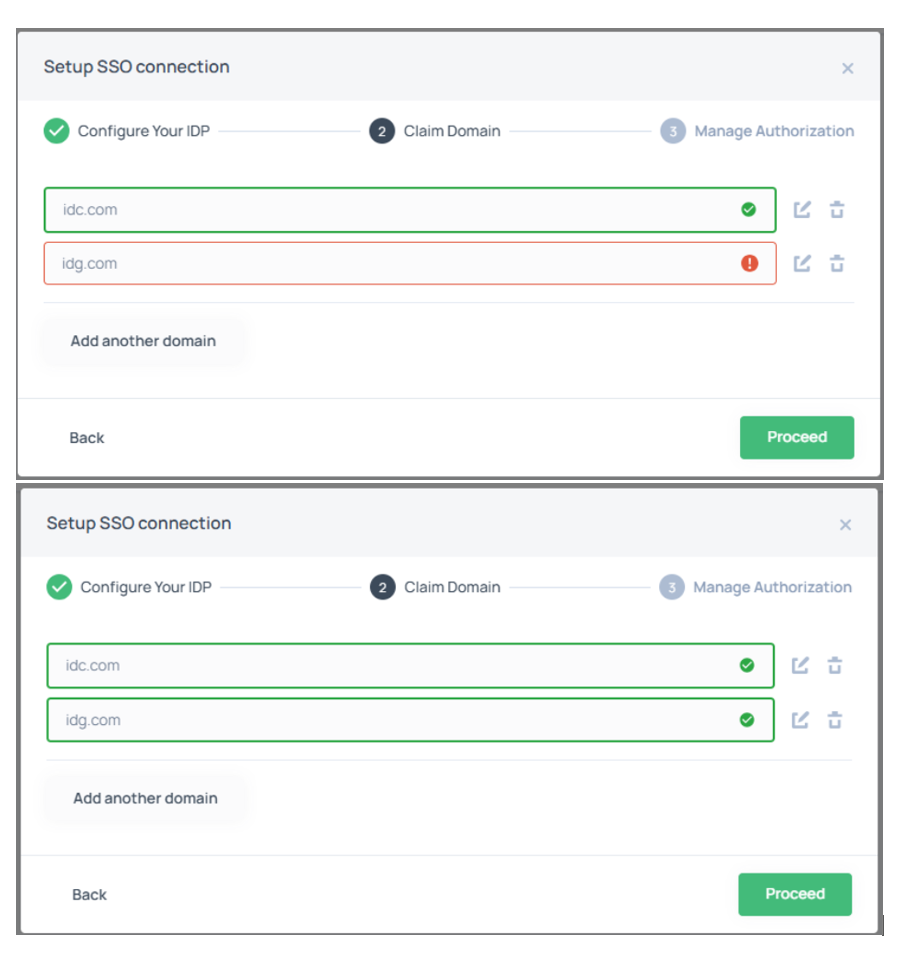
- Domain Validation Issue:
– After entering the correct domain and clicking Proceed, the system may initially display an error (!) even though the domain is valid
– To resolve this, click Edit (pencil icon) next to the domain and then click Validate.
– The domain should then be successfully validated, and a green checkmark will
appear.
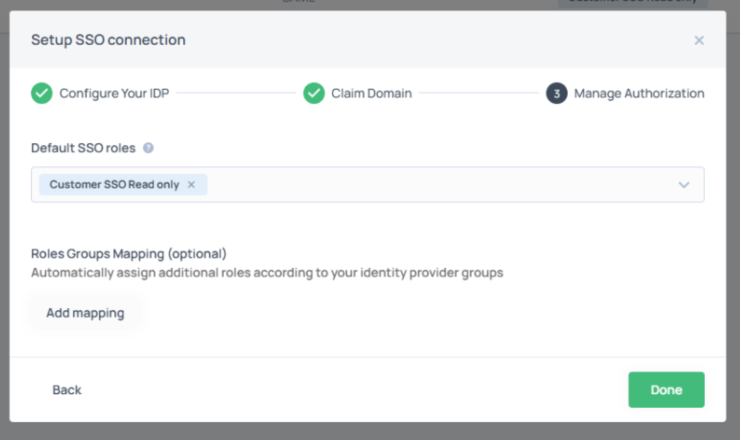
Step 4: Manage Authorization
- Select the Default SSO role: Customer SSO Read only
- Click Done
There are two SSO roles:- Customer SSO Admin – Role for SSO self-administration with permissions. This role is assigned by IDC Support.
- Customer SSO Read Only – Default role for SSO users with read-only access and no permissions.
Step 5: Enable the Connection
Note: Once you enable this connection, it will apply to all users in your organization. Users who previously signed in with email and password will no longer be able to do so and will only be able to log in via SSO.
Please enable the connection only when you’re ready to test it immediately (next step), so you can confirm everything works correctly and avoid locking users out.
- Save your configuration
- Toggle the connection to Enabled
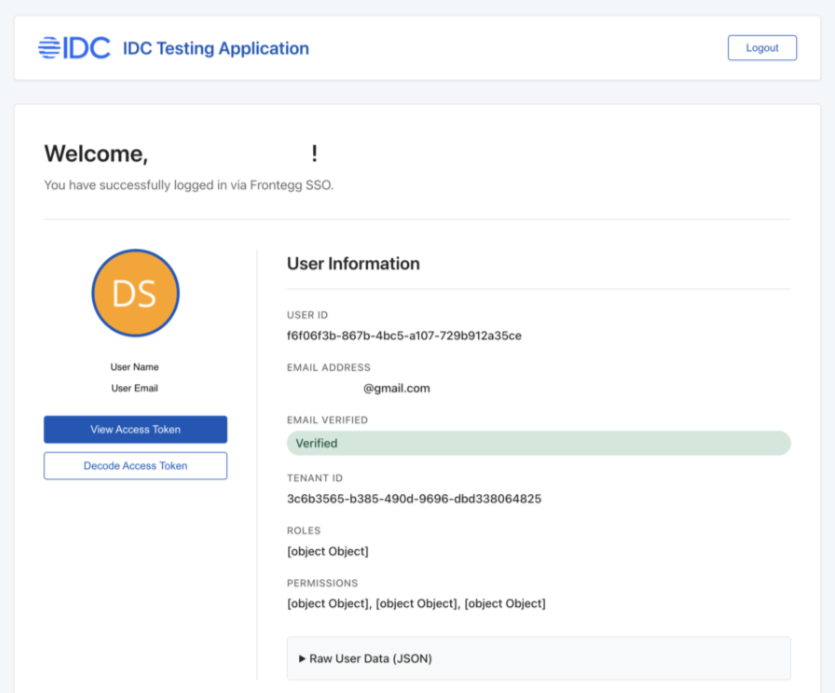
Step 6: Test the Setup
- Open a new private/incognito window in your current browser, or use a different browser to
ensure you test it like a first-time user would experience it (no active session interferes with the test). - In this new window or browser, navigate to https://demo-app.idc.com
- Log in with an SSO-enabled user from your claimed domain.
- Expected outcomes:
- If the user successfully logs in, proceed to the Closure checklist below.
- If login fails, go to the Troubleshooting Guide below
Closure checklist
Once you successfully tested Frontegg SSO login using our Test Application, please:
- Send an email to IDC Support at idc_support@idc.com so we can record completion.
Troubleshooting Guide
| Issue | Possible Cause | Resolution |
| Domain verification failed | TXT record not propagated | Wait longer (up to 24 hrs) or confirm record format |
| Certificate error | Incorrect or expired IdP certificate | Upload correct public certificate from IdP |
| Login attempt fails | Attribute mismatch (email not mapped) | Ensure email claim/attribute is mapped to user.email |
| Non-claimed domain fails login | Expected behavior | Add and verify additional domains as needed |
| SSO Login is not working | SSO configuration issue | Follow SSO is not working steps |
If your SSO login is not working:
1. Temporarily disable the SSO login (only needed if you want to let your users log in with email and password while you are fixing SSO)
2. Review and edit the SSO configuration settings as needed: Ensure your IdP configuration includes all four required attributes listed in the SAML
attributes overview.
3. Add or remove domains if needed.
4. Re-enable SSO once the configuration has been corrected (if you disabled it earlier)
5. Test your SSO login again using https://demo-app.idc.com in a new private/incognito
window or a different browser to avoid cached sessions.

Support
If you encounter issues you cannot resolve, please reach out to our Support team:
- Send an email to IDC Support idc_support@idc.com
- Domain Validation Issue:
– Your company name
– Environment (Production/QA)
– Steps attempted
– Error messages/screenshots
Attribute Mapping Reference
|
Attribute in Frontegg |
Typical IdP Claim/Attribute Name |
|---|---|
|
user.email |
email, mail, userPrincipalName |
|
user.firstName |
given_name, firstName |
|
user.lastName |
family_name, lastName |
|
user.displayName |
name, displayName |
|
user.groups |
groups, roles, memberOf |
Use these mappings to ensure attributes align correctly across your IdP and Frontegg.
Custom SAML Setup
For IdPs not listed in the Frontegg wizard:
- Create a new Custom SAML 2.0 Application in your IdP
- Configure manually or use saml-metadata.xml in section below (SAML metadata):
- Entity ID / Audience URI: IDC-SSO
- Assertion Consumer Service (ACS) URL: https://identity.idc.com/auth/saml/callback
- NameID format: Email
- Map attributes based on the Attribute Mapping Reference (see the screenshot above)
- firstName
- lastName
- uid (Optional)
- Export IdP metadata (URL or XML file) and upload to IDC Admin Portal
SAML Metadata
You can download IDC SAML metadata from: https://my.idc.com/downloads/saml-metadata.xml
Provided Entity ID is not in URL format
According to the SAML specification, the Entity ID does not need to be in a URL format. It only needs to be a unique identifier for the Service Provider. IDC has therefore chosen to use the value “IDC-SSO”.
Some IdP systems may display warnings or enforce a soft validation requiring the Entity ID to resemble a URL (e.g., starting with https://).
If you encounter this issue:
- Try saving the configuration while ignoring the validation message, if possible.
- Alternatively, you can temporarily enter a dummy URL (e.g., https://idc-sso) to complete the setup, and then edit the field afterward to use the correct value IDC-SSO.